Service Virtualization
- Service Virtualization
- Pre-requisites
- Stub Out The Product Service
- Fix The Response To /products/10
- Expectation File Format
- Add A Second Expectation
- Generate The SKU
- Try Setting Up An Invalid Expectation
- Stubbing Out The Request
- Accept Any Value For “name” and “sku” And Return A Random Id
- Generating the stub files
- SSL / Https stubbing
- Dynamic expectations (a.k.a. dynamic stubbing or mocking) - Setting expecations over Specmatic Http API
- Examples as expectations
- Programmatically starting stub server within tests
- Transient expectations (a.k.a. transient stubs)
- Matching the request body with regular expressions
- Delay Simulation
- Externalised response generation
- Hooks
- Priority Of Stubs
- Generating examples
- Sample Java Project
Pre-requisites
Let’s prepare to try out service virtaulization step-by-step.
- Download the latest version of Specmatic.
- Create a file named products-api.yaml on your laptop with the following contents.
openapi: 3.0.0
info:
  title: Sample Product API
  description: Optional multiline or single-line description in [CommonMark](http://commonmark.org/help/) or HTML.
  version: 0.1.9
servers:
  - url: http://localhost:8080
    description: Local
paths:
  /products/{id}:
    get:
      summary: Get Products
      description: Get Products
      parameters:
        - in: path
          name: id
          schema:
            type: number
          required: true
          description: Numerical Product Id
      responses:
        '200':
          description: Returns Product With Id
          content:
            application/json:
              schema:
                type: object
                required:
                  - name
                  - sku
                properties:
                  name:
                    type: string
                  sku:
                    type: string
  /products:
    post:
      summary: Add Product
      description: Add Product
      requestBody:
        content:
          application/json:
            schema:
              type: object
              required:
                - name
                - sku
              properties:
                name:
                  type: string
                sku:
                  type: string
      responses:
        '200':
          description: Returns Product With Id
          content:
            application/json:
              schema:
                type: object
                required:
                  - id
                properties:
                  id:
                    type: integer
  /storestatus:
    get:
      summary: Get the status of the store
      responses:
        '200':
          description: Status of the store
          content:
            text/plain:
              schema:
                type: string
- Create a directory named products-api_data in which we will place these stubs.
Stub Out The Product Service
- Run
java -jar specmatic.jar stub products-api.yaml - Use postman to make a request to http://localhost:9000/products/10
Specmatic returns a contract valid response. The values are randomly generated. We have not yet told Specmatic how to handle this request.
Fix The Response To /products/10
- Create a file named expectation.json, inside products-api_data, with the following contents:
{
  "http-request": {
    "method": "GET",
    "path": "/products/10"
  },
  "http-response": {
    "status": 200,
    "body": {
      "name": "Soap",
      "sku": "abc123"
    }
  }
}
- Wait a few seconds for Specmatic to load the file.
- Make the above request again from Postman.
Expectation File Format
The complete expectaion file format can be referred to here.
Add A Second Expectation
- Rename the above json file to soap.json
- Create a new json file named batteries.json in the same directory with the following data:
{
  "http-request": {
    "method": "GET",
    "path": "/products/20"
  },
  "http-response": {
    "status": 200,
    "body": {
      "name": "Batteries",
      "sku": "abc123"
    }
  }
}
- Make a request to http://localhost:9000/products/20.
Generate The SKU
We don’t care at the moment what the SKU is, but the one for Batteries is the same as the one for SOAP, and they should be different. Let’s fix that.
- In soap.json, put the value “(string)” against “sku” instead of “abc123”.
- Do the same in batteries.json.
Make an API call to http://localhost:9000/products/10 and then http://localhost:9000/products/20. Note that their SKUs are now randomly generated, and different.
Try Setting Up An Invalid Expectation
Let’s see what happens when our expectations of the API response do not align with the contract.
- Create a third file named pencils.json, with the following contents.
{
  "http-request": {
    "method": "GET",
    "path": "/products/30"
  },
  "http-response": {
    "status": 200,
    "body": {
      "name": "Pencils",
      "sku": 12345
    }
  }
}
- Wait for Specmatic to pick up the new file.
Note how Specmatic highlights
- The path to the error
- The reason for the error.
Stubbing Out The Request
- Create a new file named book.json
{
  "http-request": {
    "method": "POST",
    "path": "/products",
    "body": {
      "name": "Book",
      "sku": "pqr456"
    }
  },
  "http-response": {
    "status": 200,
    "body": {
      "id": 40
    }
  }
}
- Make a POST API call to http://localhost:9000/products, with the JSON body {“name”: “Book”, “sku”: “pqr456”}
You should get a 200 response with a json body containing “id” 40.
Accept Any Value For “name” and “sku” And Return A Random Id
- Create a new file named any.json
{
  "http-request": {
    "method": "POST",
    "path": "/products",
    "body": {
      "name": "(string)",
      "sku": "(string)"
    }
  },
  "http-response": {
    "status": 200,
    "body": {
      "id": "(number)"
    }
  }
}
- Make a POST API call to http://localhost:9000/products, with the JSON body {“name”: “any name here”, “sku”: “any sku value here”}
You should get a 200 response with a JSON body containing a randomized “id”.
Generating the stub files
Authoring the expecations / stub jsons by hand may be hard / time consuming when the API operation has a large response. Instead you can run the stub server with below option to log the request and response data sample which you can then leverage as a starting point to create custom expectations.
java -jar specmatic.jar stub products-api.yaml --jsonConsoleLog
Send a request to this server.
curl http://localhost:9000/products/1
And you can now see the request and response logged in the console where Specmatic stub server is running.
{
    #...
    "http-request": {
        "path": "/products/1",
        "method": "GET",
        "headers": {
            "Host": "localhost:9000",
            "User-Agent": "curl/7.84.0",
            "Accept": "*/*"
        },
        "body": ""
    },
    "http-response": {
        "status": 200,
        "body": {
            "name": "HCCPY",
            "sku": "CYCOA"
        },
        "status-text": "OK",
        "headers": {
            "X-Specmatic-Result": "success",
            "Content-Type": "application/json",
            "X-Specmatic-Type": "random"
        }
    },
    #...
}
This log contains the entire information about the request and response. We just need to copy the “http-request” and “http-response”, remove non-mandatory headers etc. and modify it as per our needs.
SSL / Https stubbing
There are multiple ways to run the Specmatic Stub with SSL.
Autogenerated Cert Store
This is the quickest approach.
java -jar specmatic.jar stub --httpsKeyStoreDir=<directory to create keysore> --port=443 product-api.yaml
This will create a specmatic.jks file in the dir that you mentioned above and you can now access the stub over https.
Bring your own key store
If you already have a keystore and self signed certificate you can pass it to Specmatic through below command options.
% specmatic stub --help
...
      --httpsKeyStore=<keyStoreFile>
                             Run the proxy on https using a key in this store
      --httpsKeyStorePassword=<keyStorePassword>
                             Run the proxy on https, password for pre-existing
                               key store
      --httpsPassword=<keyPassword>
                             Key password if any
Dynamic expectations (a.k.a. dynamic stubbing or mocking) - Setting expecations over Specmatic Http API
Context
It is not always possible to know ahead of time what expecation data needs to be setup. Example: Consider below scenario
- Let us say our system under test needs to lookup the SKU value from another service (over which we do not have control or cannot mock) before creating products
- In this scenario we will be unable to create the expectation json file with any specific value of SKU since we will only know this at test runtime / dynamically
Dynamic Stubs are helpful in such scenarios which involve a work flow with multiple steps where the input of a step depends on output of its previous step.
Expectations Http Endpoint
Specmatic stub server can accept expectation json through below http endpoint.
http://localhost:9000/_specmatic/expectations
Please see postman collection for reference.
Specmatic will verify these expecations against the OpenAPI Specifications and will only return a 2xx response if they are as per API Specifications. Specmatic returns 4xx reponse if the expectation json is not as per the OpenAPI Specifications.
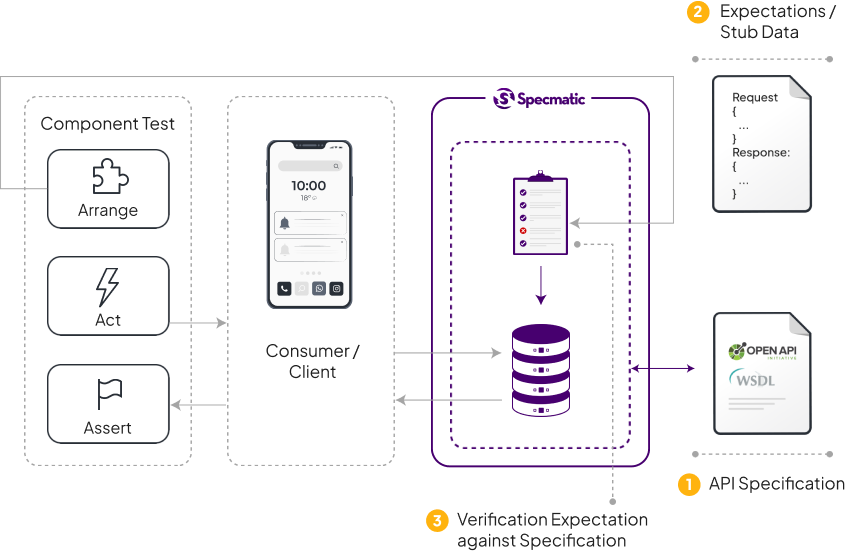
Anatomy of a Component / API Test
Please see this video for reference.
The above image shows how Specmatic Smart Mocking fits into your Component Test. A good component test isolates the system / component under test from its dependencies. Here Specmatic is emulating the dependencies of the mobile application thereby isolating it.
API Tests are just Component Tests where the System Under Test is a Service / API. Here is an example of how you can leverage Specmatic dynamic mocking in a Karate API Test. Below are the pieces involved.
- Test - A Karate API Test
- System Under Test - Find Available Products Service - Invokes products API to get all products and filters out products where inventory is zero.
- Dependency - Products API mocked by Specmatic. Specmatic is setup to leverage OpenAPI Specification of Products API in the central contract repo through specmatic.json configuration.
Let us analyse each phase of this API test.
- Arrange - In this step we setup Specmatic stub server with expectation json through Specmatic http endpoint to emulate the Products API. We set it up to return two products, a laptop (which is available) and a phone (inventory is zero). We also verify that Specmatic has accepted this expectation data by asserting that the response code is 2xx. This confirms that are our expectation data is in line with the OpenAPI Specification of Products OpenAPI Specification.
- Act - Here the Karate test invokes System / Service Under Test (Find Products Service) to exercise the functionality we need to test. This inturn results in the System / Service Under Test invoking its dependency (Products Service) which is being emulated by Specmatic. Specmatic returns the response we have setup in the previous step to the System Under Test. System Under Test processes this data and responds to API Test.
- Assert - We now verify the response from System / Service Under Test to ascertain if it has only returned the laptop, since the phone is not available.
The same approach can be leveraged in other test tools and frameworks such as Rest-Assured also.
Examples as expectations
If an example in the request and an example in the response of a particular path have the same name, Specmatic will use them together as a stub expectation. It will be the equivalent of creating a stub.json file, specifying the path, method and the request body under http-request, and the status and response body body under http-response.
This only works for request and response JSON bodies right now. It does not work for headers, query params, path params, multi part or form fields. If any of those need to be stubbed out, use the stub.json file or dynamic expectations. Support for these will be added later.
For example, take the following API specification:
openapi: 3.0.0
info:
  title: Employees
  version: '1.0'
servers: []
paths:
  '/employees':
    post:
      summary: ''
      requestBody:
        content:
          application/json:
            schema:
              $ref: '#/components/schemas/Employee'
            examples:
              CREATE_EMPLOYEE_SUCCESS:
                value:
                  name: Jill Doe
                  department: Engineering
                  designation: Director
      responses:
        '201':
          description: Employee Created Response
          content:
            application/json:
              schema:
                type: object
                properties:
                  id:
                    type: string
                required:
                  - id
              examples:
                CREATE_EMPLOYEE_SUCCESS:
                  value:
                    id: 10
components:
  schemas:
    Employee:
      title: Employee
      type: object
      required:
        - id
        - name
        - department
        - designation
      properties:
        name:
          type: string
        department:
          type: string
        designation:
          type: string
If you stub it out, right out the gate, with no further _data files or any effort, if you send POST /znsio/specmatic/employees with a JSON object {"name": "Jill Doe", "department": "Engineering", "designation": "Directory"}, you’ll get back {"id": 10}. Note how both the request and response exist as examples in the specification, and are being used directly as expectations with no further effort.
Note that this currently works only for JSON request and response payloads. Support for other parts such as headers, query parameters, etc will be implemented soon.
Programmatically starting stub server within tests
-
If your tests are written in a JVM based language, you can start and stop the stub server within your tests programmatically.
Add
specmatic-corejar dependency with scope set to test since this need not be shipped as part of your production deliverable.<dependency> <groupId>in.specmatic</groupId> <artifactId>specmatic-core</artifactId> <version>1.3.12</version> <scope>test</scope> </dependency>Now you can import the utilty to create the stub server. Below code snippets are in Kotlin. However the overall concept is the same across all JVM languages such as Clojure, Scala or plain Java.
import `in`.specmatic.stub.createStubThis utility can now be used in your test
setup/beforeAllmethod to start the stub server. Specmatic automatically looks for yourspecmatic.jsonfile in project root directory / classpath to locate your API Specification files that need to run as part of the stub server.@BeforeAll @JvmStatic fun setUp() { stub = createStub() }We can now programmatically set dynamic expectations on the
stubwith thesetExpectation(<expectationJson>)method where<expecationJson>is in the same format as static expecationsstub.setExpectation(expectationJson);And subsequently once your tests are done, you can shutdown the stub server as part of your
teardown/afterAllmethod.@AfterAll @JvmStatic fun tearDown() { service?.stop() stub.close() }Here are complete examples of Karate API test that leverages the above technique.
Please note that this is only a utility for the purpose of convenience in Java projects. Other programming languages can simply run the Specmatic standalone executable just as easily. If you do happpen to write a thin wrapper and would like to contribute the same to the project, please refer to our contribution guidelines.
-
If your tests are written in Python, you can start and stop the stub server within your tests programmatically.
-
Install the Specmatic Python library: Use pip, a package installer for Python, to install the Specmatic library.
pip install specmatic -
Run Tests with a Stub: If you want to run the tests with a stub, you can do so like this:
import os
from specmatic.core.specmatic import Specmatic
from your_project import app
PROJECT_ROOT_DIR = os.path.dirname(os.path.abspath(__file__))
app_host = "127.0.0.1"
app_port = 5000
stub_host = "127.0.0.1"
stub_port = 5000
expectation_json_file = PROJECT_ROOT_DIR + '/test/data/expectation.json'

Specmatic() \
    .with_project_root(PROJECT_ROOT_DIR) \
    .with_stub(stub_host, stub_port, [expectation_json_file]) \
    .with_wsgi_app(app, app_host, app_port) \
    .test(TestContract) \
    .run()
In this example, we are passing an instance of wsgi app like flask.
stub_host,stub_port, andexpectation_json_fileare the the host and port for the stub server, and the path to a JSON file containing expectations for the stub, respectively. Replaceappwith your Flask application object.Here are complete example of Specmatic stub server usage in Python.
-
Transient expectations (a.k.a. transient stubs)
A transient mock disappears immediately after it has been exercised.
Setting transient expectations
For example, create this stub file for products-api.yaml contract:
{
  "http-stub-id": "123",
  "http-request": {
    "method": "GET",
    "path": "/storestatus",
  },
  "http-response": {
    "status": 200,
    "body": "open"
  }
}
Make an HTTP request to http://localhost:9000/storestatus with the GET method. The response says “open”.
Now try the same request again. The response is a randomized string.
This is useful particularly when there are no distinguishing features of the request like in the above example, and we need to simulate a succession of calls to that API giving different responses.
Clearing transient expectations
If the test fails and you need to start a new run of the test, you may need to clear all the transient mocks so that the two tests do not step on eachother’s toes.
To do that, make an API call to the path /_specmatic/http-stub/
To clear the transient mock in the above example, you would call http://localhost:9000/_specmatic/http-stub/123 with the DELETE verb.
Matching the request body with regular expressions
When a part of the string varies while the rest remains the same (e.g. a timestamp in the string that changes with each test), we use a regex to match the string. This lets us match exactly the parts of the string that do not change, while allowing for parts of the string to vary.
{
  "http-request": {
    "method": "POST",
    "path": "/data",
    "body": "(string)",
    "bodyRegex": "^hello (.*)$"
  },
  "http-response": {
    "status": 200,
    "body": {
      "id": 40
    }
  }
}
This would match a request with body hello world, but would not match hi world.
Against the same contract, we could set another expectation with requestBodyRegex value ^Good (.*)$ which would match Good morning but not What a great morning.
A regular expression could be added as a constraint to the contract, but it would apply to all stubs. This is not a contract-level constraint. It’s meant to be used when specific scenarios are hard to match because parts of the string are generated by the application and are hard to predict.
Delay Simulation
Specmatic allows granular control over simulating a slow response for certain requests.
Let us create another expecation file on the same lines as expectation.json in the products-api_data folder and call it expectation-with-delay.json with below content.
{
  "http-request": {
    "method": "GET",
    "path": "/products/11"
  },
  "http-response": {
    "status": 200,
    "body": {
      "name": "Slow Soap",
      "sku": "slow1234"
    }
  },
  "delay-in-seconds": 3
}
We have set the delay to 3 seconds here. Once the Specmatic stub server has loaded this expectation, time the request for product id 11 and you should see a 3 second delay.
% time curl http://localhost:9000/products/11
{
    "name": "Slow Soap",
    "sku": "slow1234"
}curl http://localhost:9000/products/11  0.01s user 0.01s system 0% cpu 3.082 total
All other requests, other than the specific request (product id 11) where a delay has been setup, will continue to behave as usual.
Externalised response generation
There may be circumstances where we need to compute the response or part of it based on the request in the expectation. Here is an example.
openapi: 3.0.1
info:
  title: New Feature
  version: "1"
paths:
  /triple/{value}:
    get:
      summary: three times
      parameters:
      - name: value
        in: path
        required: true
        schema:
          type: number
      responses:
        "200":
          description: three times
          content:
            application/json:
              schema:
                type: number
This OpenAPI specification expects given input to be multiplied by three. It may not be possible to create expectation for each individual number. In this can we can create an expecation that can call an external command to which it can pass the incoming request and then return the value generated by that external command.
{
    "http-request": {
        "method": "GET",
        "path": "/triple/(value:number)"
    },
    "http-response": {
        "status": 200,
        "body": "10",
        "externalisedResponseCommand": "<path to>/response.sh"
    }
}
In the above expecation file since we are providing the externalisedResponseCommand, Specmatic will ignore the data inside http-reponse body. Instead it call the command (response.sh) that is mentioned in externalisedResponseCommand and pass the incoming request as a environment variable SPECMATIC_REQUEST.
#!/bin/bash

value=${SPECMATIC_REQUEST:20:1}

cat << EOF
{
    "status": 200,
    "body": $((value * 3)),
    "status-text": "OK",
    "headers": {
        "X-Specmatic-Result": "success",
        "Content-Type": "text/plain"
    }
}
EOF
The above shell script is just an example, the external command can be any executable / script / program which can read an environment variable. The example shell script here is reading the path parameter and multiplying it by three. The response of this script / command is returned as the response to the request.
Hooks
Specmatic can modify the specification before loading it.
Let’s see a quick example of a frontend that connects to the backend API through an API gateway.
Here is an API specification for a products API.
openapi: 3.0.0
info:
  title: Sample Product API
  version: 0.0.1
servers:
  - url: http://localhost:8080
    description: Local
paths:
  /products:
    get:
      summary: Get Products
      description: Get Products
      parameters:
        - in: path
          name: id
          schema:
            type: number
          required: true
          description: Numerical Product Id
        - in: header
          name: X-internal-id
          schema:
            type: string
          required: true
          description: Internal customer id
      responses:
        '200':
          description: Returns Product With Id
          content:
            application/json:
              schema:
                type: array
                items:
                  type: object
                  required:
                    - name
                    - sku
                  properties:
                    name:
                      type: string
                    sku:
                      type: string
The expectation used by the consumer when stubbing out the Products API Backend looks something like this:
{
  "http-request": {
    "headers": {
      "X-auth-token": "abc 123"
    },
    "method": "GET",
    "path": "/products"
  },
  "http-response": {
    "status": 200,
    "body": [
      {
        "name": "Rice",
        "sku": "sku123"
      }
    ]
  }
}
Note how the consumer sends the header X-auth-token in the request. The API gateway replaces it at runtime with X-internal-id, and forwards the request to the backend (note that the specification declares the header X-internal-id, not X-auth-token).
The specification as-is will not accept the above frontend expectation, without a small modification, which can be achieved using Specmatic’s stub_load_contract hook.
Create the specamtic.json file with the following content:
{
  "sources": [
    {
      "provider": "git",
      "stub": [
        "products.yaml"
      ]
    }
  ],
  "hooks": {
    "stub_load_contract": "python3 header.py"
  }
}
Create a file named header.py in the root of your project, with the following code:
import os
import sys
import yaml

def main():
    # Read the name of the file from the environment variable
    file_name = os.getenv('CONTRACT_FILE')

    if not file_name:
        print("CONTRACT_FILE environment variable not set.")
        sys.exit(1)

    try:
        with open(file_name, 'r') as file:
            # Load the YAML file
            data = yaml.safe_load(file)

            # Modify the specified header
            paths = data.get('paths', {})
            products_path = paths.get('/products/{id}', {})
            get_operation = products_path.get('get', {})
            parameters = get_operation.get('parameters', [])

            for param in parameters:
                if param.get('in') == 'header' and param.get('name') == 'X-internal-id':
                    param['name'] = 'X-auth-token'
                    break

            # Print the modified data
            print(yaml.dump(data))
    except FileNotFoundError:
        print(f"File not found: {file_name}")
        sys.exit(2)
    except Exception as e:
        print(f"Error processing file: {e}")
        sys.exit(3)

if __name__ == "__main__":
    main()
This sample hook code replaces the header name X-internal-id with X-auth-token.
Now when Specmatic is run in stub mode, it will invoke the hook, pass the specification path to it using through the environment variable CONTRACT_FILE, and then load whatever specification is printed by the hook to standard output.
Priority Of Stubs
There are now several ways in which to provide expectations.
- Transient expectations
- Dynamic expectations
- Static expectations
- Expectations from examples in the specification
They are resolved in the order in which they appear above.
This means, if a request matches an example in the specification, but also matches a dynamic expectation, the response will be served from the dynamic expectations. Put differently, dynamic expectations override expectations from examples.
Generating examples
You can generate sample data from a specification as a starting point or scaffolding for your contract tests, using the examples command:
java -jar specmatic.jar examples employees.yaml
In the above case, sample files will be written into the directory named employees_data.