Contract Tests
- Contract Tests
- Overview
- Specmatic Contract Test - Command Line
- How the contract test works (step-by-step)
- Externalising examples / test cases
- Boundary Condition Testing
- JUnit Output From The Command
- When The API Does Not Match The API Specification
- Declaring Contracts In Configuration
- The Java Helper For Java Projects
- Handling Application authentication
- Contracts In A Mono-Repo
- Authentication In CI For HTTPS Git Source
- Authentication In CI For SSH Git Source
- Examples For WSDL Contracts
- Programmatically executing Specmatic Contract as Tests
- Referring to local specificatons
- Examples that are not passing yet
- Examples that trigger 400 responses
- Run only passing tests in CI
- Omitting some tests
- API Coverage
- Adanced Features
- Generating examples
- Sample Project
Overview
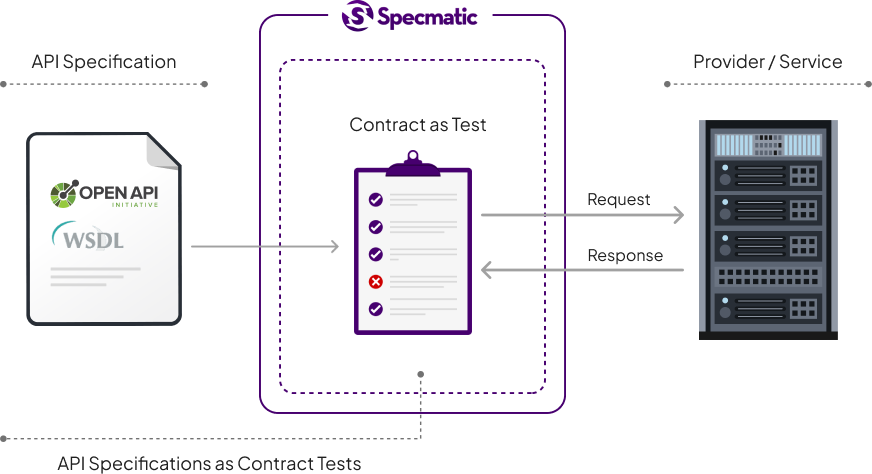
As seen in “getting started” Specmatic is able to leverage your API Specifications as “Contract Tests” to verify if your application is adhering the specification. This step is critical in making sure that your application / provider is honouring its side of the contract in the “Contract Driven Development” process just like how consumers build against a smart mock that is based the same OpenAPI Specification.
Specmatic Contract Test - Command Line
Create a file named “employees.yaml” and copy below content into it. This is an API Specification for an employee service which allows fetching and updating employee details.
openapi: 3.0.0
info:
  title: Employees
  version: '1.0'
servers: []
paths:
  '/znsio/specmatic/employees':
    post:
      summary: ''
      requestBody:
        content:
          application/json:
            schema:
              $ref: '#/components/schemas/Employee'
            examples:
              CREATE_EMPLOYEE_SUCCESS:
                value:
                  id: 70
                  name: Jill Doe
                  department: Engineering
                  designation: Director
      responses:
        '201':
          description: Employee Created Response
          content:
            application/json:
              schema:
                $ref: '#/components/schemas/Employee'
              examples:
                CREATE_EMPLOYEE_SUCCESS:
                  value:
                    id: 70
                    name: Jill Doe
                    department: Engineering
                    designation: Director
  '/znsio/specmatic/employees/{id}':
    parameters:
      - schema:
          type: number
        name: id
        in: path
        required: true
        examples:
          FETCH_EMPLOYEE_SUCCESS:
            value: 10
          FETCH_EMPLOYEE_NOT_FOUND_ERROR:
            value: 100
          UPDATE_EMPLOYEE_SUCCESS:
            value: 10
    get:
      summary: Fetch employee details
      tags: []
      responses:
        '200':
          description: Details for employee id in request
          content:
            application/json:
              schema:
                $ref: '#/components/schemas/Employee'
              examples:
                FETCH_EMPLOYEE_SUCCESS:
                  value:
                    id: 10
                    name: Jane Doe
                    department: Engineering
                    designation: Engineering Manager
        '404':
          description: Employee with given id not found
          content:
            application/json:
              schema:
                type: object
                properties: {}
              examples:
                FETCH_EMPLOYEE_NOT_FOUND_ERROR:
                  value: {}
    put:
      summary: ''
      requestBody:
        content:
          application/json:
            schema:
              $ref: '#/components/schemas/Employee'
            examples:
              UPDATE_EMPLOYEE_SUCCESS:
                value:
                  id: 10
                  name: Jill Doe
                  department: Engineering
                  designation: Director
      responses:
        '200':
          description: Updated employee details
          content:
            application/json:
              schema:
                $ref: '#/components/schemas/Employee'
              examples:
                UPDATE_EMPLOYEE_SUCCESS:
                  value:
                    id: 10
                    name: Jill Doe
                    department: Engineering
                    designation: Director
components:
  schemas:
    Employee:
      title: Employee
      type: object
      required:
        - id
        - name
        - department
        - designation
      properties:
        id:
          type: integer
        name:
          type: string
        department:
          type: string
        designation:
          type: string
Here is a sample application that is is implementing this specification. You can run a curl command on this URL to see the sample data.
https://my-json-server.typicode.com/znsio/specmatic/employees/
Let us now run the employees.yaml as a test against the above sample application.
java -jar /path/to/specmatic.jar test employees.yaml --testBaseURL https://my-json-server.typicode.com
The results should end with below text.
Tests run: 4, Successes: 4, Failures: 0, Errors: 0
And if you further analyse the test logs for PUT /znsio/specmatic/employees/{id}, you will notice that specmatic sent the value 10 and did not generate a random value. How did this happen?
- Specmatic is able to correlate the request and response examples based on naming convention.
- In the
employees.yamlyou will notice several examples for the employeeId parameter each with a different name, these same names are again used in the response examples also. This is what is helping Specmatic tie the request and response together. - In OpenAPI, while it is possible to define several possible responses for an operation, it is not possible to define which input generates which response. This is the reason why Specmatic has to depend on the example names.
How the contract test works (step-by-step)
Let’s go over how the above contract test works once again.
The purpose of the contract test is to check if the application understands a specification-valid request and returns a specification-valid response.
Let’s take the example of FETCH_EMPLOYEE_SUCCESS in the above specification.
First, Specmatic’s test command collects all the examples named FETCH_EMPLOYEE_SUCCESS in the parameters section of /znsio/specmatic/employees/{id} in the above specification, and sends a GET request with these values to /znsio/specmatic/employees/{id}. These examples serve as test data for Specmatic. Specmatic expects that the application will understand them and return the expected response.
Needless to say, the application must be setup before the contract tests run to return the required response.
Next, when the application sends back a response, Specmatic must validate it against the specification. But /znsio/specmatic/employees/{id} has a 200 and a 404 response in the spec. How does Specmatic know which of the two to expect? Specmatic just looks for a response example named FETCH_EMPLOYEE_SUCCESS, and finds it under the 200. Hence, the response code is expected to be 200, and the payload must match that defined under the 200 response. Any response from the application with a 200 status code matching the 200 response specification will be accepted by Specmatic.
Thus, the request and response examples named FETCH_EMPLOYEE_SUCCESS taken together comprise a contract test named FETCH_EMPLOYEE_SUCCESS.
Note that the response example named FETCH_EMPLOYEE_SUCCESS is not compared with values returned by the application. This is what sets a Contract Test apart from an API Test. A Contract Test is concerned with checking the APIs signature, while API tests are concerned wtih checking the APIs logic.
However the response example named FETCH_EMPLOYEE_SUCCESS is verified and used in service virtualization.
Externalising examples / test cases
You can store test data in json files side-by-side to be used in the contract test, instead of inline examples.
Let’s try it out. Use the following specification (it is the same specification from the above section without the inline examples):
filename: employees_without_examples.yaml
openapi: 3.0.0
info:
  title: Employees
  version: '1.0'
servers: []
paths:
  '/znsio/specmatic/employees':
    post:
      summary: ''
      requestBody:
        content:
          application/json:
            schema:
              $ref: '#/components/schemas/Employee'
      responses:
        '201':
          description: Employee Created Response
          content:
            application/json:
              schema:
                $ref: '#/components/schemas/Employee'
  '/znsio/specmatic/employees/{id}':
    parameters:
      - schema:
          type: number
        name: id
        in: path
        required: true
    get:
      summary: Fetch employee details
      tags: []
      responses:
        '200':
          description: OK
          content:
            application/json:
              schema:
                $ref: '#/components/schemas/Employee'
        '404':
          description: Not Found
          content:
            application/json:
              schema:
                type: object
                properties: {}
    put:
      summary: ''
      requestBody:
        content:
          application/json:
            schema:
              $ref: '#/components/schemas/Employee'
      responses:
        '200':
          description: Update employee details
          content:
            application/json:
              schema:
                $ref: '#/components/schemas/Employee'
components:
  schemas:
    Employee:
      title: Employee
      type: object
      required:
        - id
        - name
        - department
        - designation
      properties:
        id:
          type: integer
        name:
          type: string
        department:
          type: string
        designation:
          type: string
Create a directory named employees_without_examples_tests, and store the following json files in it:
filename: create_employee.json
{
  "http-request": {
    "method": "POST",
    "path": "/znsio/specmatic/employees",
    "body": {
      "id": 70,
      "name": "Jill Doe",
      "department": "Engineering",
      "designation": "Director"
    }
  },
  "http-response": {
    "status": 201
  }
}
filename: fetch_employee_details.json
{
  "http-request": {
    "method": "GET",
    "path": "/znsio/specmatic/employees/10"
  },
  "http-response": {
    "status": 200
  }
}
filename: employee_not_found.json
{
  "http-request": {
    "method": "GET",
    "path": "/znsio/specmatic/employees/100"
  },
  "http-response": {
    "status": 404
  }
}
filename: update_employee.json
{
  "http-request": {
    "method": "POST",
    "path": "/znsio/specmatic/employees/10",
    "body": {
      "id": 10,
      "name": "Jill Doe",
      "department": "Engineering",
      "designation": "Director"
    }
  },
  "http-response": {
    "status": 200
  }
}
Let us now run employees_without_examples.yaml as a test against the sample application.
java -jar /path/to/specmatic.jar test --testBaseURL https://my-json-server.typicode.com employees_without_examples.yaml
The results will be exactly the same as the previous run.
Tests run: 4, Successes: 4, Failures: 0, Errors: 0
The complete test data format can be referred to here.
Boundary Condition Testing
In the above example, we only ran the happy path test cases. What if we send an number to a boolean parameter? What if we send a null to a non-nullable parameter? What if we do not send a mandatory parameter? How does the application handle these errors? Input validation is an important aspect of your api security strategy (OWASP reference).
Specmatic can help you verify / assess such boundary condition behavior and the associated error handling in your application. Let us run the Specmatic tests with the SPECMATIC_GENERATIVE_TESTS environment variable set to true.
export SPECMATIC_GENERATIVE_TESTS=true
java -jar /path/to/specmatic.jar test --testBaseURL https://my-json-server.typicode.com employees.yaml
Earlier for the same input we saw 4 tests and all of which were successful. This time around you will see a total of 26 tests, of which 21 are failires
Tests run: 26, Successes: 5, Failures: 21, Errors: 0
Exercise: Analyse the logs to understand what input validations need to be added to the application.
Demo: Video
JUnit Output From The Command
You can get the JUnit output from the Specmatic command using an extra parameter.
java -jar /path/to/specmatic.jar --testBaseURL https://my-json-server.typicode.com --junitReportDir ./test-output
The command will create JUnit test xml output in the specified directory which you can then include as part of CI pipeline results etc.
When The API Does Not Match The API Specification
As we saw earlier in this page, the sample application is adhering to the employees.yaml OpenAPI Specification.
Now let us experiment by making some changes to the dataypes in the employees.yaml and observe the error responses.
Examples:
- Change the datatype of
designationto integer in scheme component Employee - You will notice that Specmatic will complain that your examples are not as per the Specification - Now lets update all the examples for
designationto value1- Now Specmatic will run the test and you should see a single failure
We encourage you to try more such modifications to the specification such as adding / removing parameters, updating datatypes, etc. This will give you picture of how Contract Tests work.
Note: If you modify the request, it’s possible that the application will respond with a 404 or 500, and you may not see anything more interesting than a mismatched status. But if you modify any response structure in the contract, leaving the request intact, e.g. change an integer to a string or vice versa, the application will send recognize the requests, send response back that do not match the contract which you have modified, and you will see interesting error feedback.
Declaring Contracts In Configuration
In the last example, we ran run contract tests above by passing the contract path to Specmatic. The drawback here is that the command is not easily machine parseable. It will not be easy for tools to find out which contract is being run as test on which service, and do further analysis. Updating the command to add more contracts will also be more error prone.
So instead:
- Create a file named specmatic.json.
{
  "sources": [
    {
      "provider": "git",
      "repository": "https://github.com/your-username-or-org/your-repo.git",
      "test": [
        "path/to/employees.yaml"
      ]
    }
  ]
}
- Create a git repository and push the employees.yaml contract into it.
- Update the value of “repository” to the url of the git repo. This should be a url that could be used by git checkout.
- Update the contract path in “test” to the relative path of employees.yaml within the git repository.
Specmatic will use the git command to checkout the git repository provided in specmatic.json. So make sure that the git command works on your laptop.
On the command line, cd into the directory containing specmatic.json.
Run this command: java -jar /path/to/specmatic.jar --testBaseURL https://my-json-server.typicode.com
Note that no contracts are passed to Specmatic. Since no contracts have been passed, Specmatic looks for specmatic.json in the current working directory, checks out the contract repo, and runs the specified contracts as contract tests.
Since Specmatic uses specmatic.json in the current working directory, it’s important to use cd into the directory containing specmatic.json. For Java projects, specmatic.json should be in the same directory as the pom.xml or build.gradle file.
Since Specmatic uses git under-the-hood, any authentication requirements of your git server will be handled by the underlying git command.
Note:
- The value of “repository” is the git repository in which the contracts are declared. It can be any git repo, not just github.
- The value of “test” is a list of contract paths, relative to the repository root, which should be run as contract tests.
- You may declare multiple contracts in the “test” list.
- “sources” holds a list. You may declare multiple sources if required. However we recommend using a single contract repository to be shared across your organisation, or ecosystem within the organisation (if your org is large).
If you need to experiment with files on the local filesystem, here’s how you can declare specifications locally, in specmatic.json:
{
  "sources": [
    {
      "provider": "filesystem",
      "test": [
        "path/to/employees.yaml"
      ]
    }
  ]
}
The filesystem path above is a relative path, but it can also be an absolute path to a file.
The Java Helper For Java Projects
For Java projects, you can use the Java helper that ships with Specmatic.
Add the following dependencies to your pom.xml file.
<dependency>
    <groupId>in.specmatic</groupId>
    <artifactId>junit5-support</artifactId>
    <version>1.3.12</version>
    <scope>test</scope>
</dependency>
<dependency>
    <groupId>org.junit.jupiter</groupId>
    <artifactId>junit-jupiter</artifactId>
    <version>5.8.2</version>
    <scope>test</scope>
</dependency>
Add a class that inherits from SpecmaticJUnitSupport. See how this is done here.
In it, set the “host” and “port” properties to tell Specmatic where to find the application. You can also start the application in that class.
Add specmatic.json at the project root, as described in the previous section.
SpecmaticJUnitSupport is a dynamic JUnit5 test. It will read the contracts from specmatic.json, and run them.
Since it is a JUnit5 test, you can run it in all the ways you are used to. If you run it in the IDE, you’ll see the results in your IDEs GUI. If you run mvn test, Surefire will store the results of the contract tests in the JUnit xml output file alongside any other JUnit tests in your project. The same applies to ./gradlew test.
Handling Application authentication
If the OpenAPI contract defines API authentication using security schemas, these information will be used by Specmatic when running contract tests. Read more about it on the page on authentication.
Contracts In A Mono-Repo
If you are using a mono-repo, in which all the projects in the ecosystem are in the same repository, the contracts used by these projects may also be kept in the same repository.
specmatic.json may look like this:
{
  "sources": [
    {
      "provider": "git",
      "test": [
        "contracts/path/to/employees.yaml"
      ]
    }
  ]
}
Note that “repository” is missing. Specamtic will look for the contract in the git repository containing specmatic.json. It’s presumed that specmatic.json would be in a git repository, as the project would have to be pushed into some git repository.
Authentication In CI For HTTPS Git Source
Specmatic does a checkout of the git repository given in specmatic.json using the git command. On your laptop, the git command will take care of authentication and prompt you for a password. But a build on a CI server runs headless without no chance for a user to enter credentials, so the git checkout fails when it gets an authentication failure from the repository.
Instead, Specmatic can do the checkout using OAuth2 authentication, which is also supported by most git providers.
Add a key named “auth” to specmatic.json, as seen in the example below.
{
  "auth": {
    "bearer-file": "central_repo_auth_token.txt"
  },
  "sources": [
    {
      "provider": "git",
      "repository": "https://github.com/your-username-or-org/your-repo.git",
      "test": [
        "path/to/employees.yaml"
      ]
    }
  ]
}
In CI, the necessary oauth2 token must be fetched and stored in a file named central_repo_auth_token.txt (as configured) side-by-side with specmatic.json, before running contract tests.
If you are using Microsoft Azure as both your git provider as well as CI, you can use a secret build variable named System.AccessToken, provided by Microsoft Azure, as your OAuth2 bearer token. Before running the tests, use a script to place the value of this variable in a file. For example:
# Sample azure pipeline snippet
steps:
  - bash: |
      echo $(System.AccessToken) > central_repo_auth_token.txt
    displayName: Create auth token file
  - bash: |
      mvn test
You could also use an environment variable to pass the token.
{
  "auth": {
    "bearer-environment-variable": "BEARER"
  },
  "sources": [
    {
      "provider": "git",
      "repository": "https://github.com/your-username-or-org/your-repo.git",
      "test": [
        "path/to/employees.yaml"
      ]
    }
  ]
}
Again, using an example for Microsoft Azure:
# Sample azure pipeline snippet
steps:
  - bash: |
      mvn test
    env:
      BEARER: $(System.AccessToken)
We have provided samples for Azure, but the same can be done easily in any build system.
Note that if you are using different systems for git and CI, the two will not be integrated. The first step is to fetch the OAuth2 token from the git repo. The second step is to create the file or environment variable as described above, and finally, you may run the contract tests.
Authentication In CI For SSH Git Source
You can also use an ssh url as your git source. Take the help of your DevOps team to generate SSH keys locally and on your CI server, and place the local and CI public keys in .ssh/authorized_keys your git server. This will enable the git command to handle authentication seamlessly via SSH authentication.
Examples For WSDL Contracts
A WSDL contract cannot hold examples within the contract. The format does not support it.
We can instead add examples to a companion file. The companion file should be in the same directory as the wsdl file. It would look like this:
Feature: WSDL Companion file
  Background:
    Given wsdl ./soap-contract-file.wsdl

  Scenario: Add user
    When POST /soap-service-path
    Then status 200

    Examples:
    | (REQUEST-BODY)        | SOAPAction | Any other headers... |
    | <soapenv>...</soapenv> | "/addUser" | header values        |
(REQUEST-BODY) contains the request body in a single line, SOAPAction contains the value value of the SOAPAction header, and additional columns must be included for each header sent by the SOAP service.
Programmatically executing Specmatic Contract as Tests
-
If your building your application in a JVM based language, you can run Specmatic Contract Tests programmatically just like any other JUnit test and also get similar feedback within your IDE.
Add Specmatic JUnit Support Jar dependency.
<dependency>
    <groupId>in.specmatic</groupId>
    <artifactId>junit5-support</artifactId>
    <version>1.3.12</version>
    <scope>test</scope>
</dependency>
Also add the junit5 dependency so that we can use the
BeforeAllandAfterAllannotations.<dependency> <groupId>org.junit.jupiter</groupId> <artifactId>junit-jupiter</artifactId> <version>5.8.2</version> <scope>test</scope> </dependency>No we need to extend
SpecmaticJUnitSupportto run Contract Tests programmatically. Specmatic will locate the API Specifications to run as a test based on the configurations in yourspecmatic.jsonfile. All you need to additionally provide is thehostandportwhere your application is running.public class ContractTests extends SpecmaticJUnitSupport { @BeforeAll public static void setUp() { System.setProperty("host", "localhost"); System.setProperty("port", "8080"); } }Here is a complete Specmatic Contract Test example for a Springboot application.
-
-
Install the Specmatic Python library: Use pip, a package installer for Python, to install the Specmatic library.
pip install specmatic -
Create a test file: In your project’s test directory, create a new Python file named
test_contract.py. -
Declare a Test Class: In
test_contract.py, declare a class namedTestContract. This class will serve as the container for your contract tests.class TestContract: pass -
Configure and Run Contract Tests: Use the Specmatic class to configure and run your contract tests. Here’s an example of how to do this for a Flask application:
import os
from specmatic.core.specmatic import Specmatic
from your_project import app,
PROJECT_ROOT_DIR = os.path.dirname(os.path.abspath(__file__))
app_host = "127.0.0.1"
app_port = 5000

Specmatic() \
    .with_project_root(PROJECT_ROOT_DIR) \
    .with_wsgi_app(app, app_host, app_port) \
    .test(TestContract) \
    .run()
In this example, replace
your_projectwith your project’s name andappwith your Flask application object. If app_host and app_port are not specified, the app will be started on a random available port on 127.0.0.1. -
Run the Tests: You can run the tests from either your IDE or command line by pointing pytest to your test folder:
pytest test -v -sNote: Please ensure that you set the ‘-v’ and ‘-s’ flags while running pytest so that pytest will run all the tests in the test directory and provide detailed output, including any output from the tests themselves.
Here is a complete Specmatic Contract Test example for a flask application.
-
Note: declare your specifications in specmatic.json as described above in the section on declaring contracts in configuration. specmatic.json should be created at the root of your project.
Referring to local specificatons
If you want to temporarily refer to API specifications on your local machine please use system property contractPaths.
@BeforeAll
public static void setUp() {
    File apiContract = new File("<path to API specification>/orders-api-v1.yaml");
    System.setProperty("contractPaths", apiContract.getAbsolutePath());
    System.setProperty("host", "localhost");
    System.setProperty("port", "8080");
}
Examples that are not passing yet
The contract is used as a collaboration tool. Sometimes, a contract violation may take time to fix. It may be useful to add examples that demonstrate the problem to the contract without breaking the build.
To do this, the example name should start with [WIP].
For example, an example of a failing contract tests for a 200 response could look like this:
"[WIP] SUCCESS":
  value:
    id: 10
    name: "Herbie"
Note the quotes around the name, which are necessary because of the space required between [WIP] and SUCCESS.
Examples that trigger 400 responses
To trigger a 400 response, you may need a contract-invalid example. Specmatic will not enforce contract validity for examples that are meant to trigger a 400 response.
For example:
openapi: 3.0.0
info:
  title: Employees
  version: '1.0'
servers: []
paths:
  '/znsio/specmatic/employees':
    post:
      summary: ''
      requestBody:
        content:
          application/json:
            schema:
              $ref: '#/components/schemas/Employee'
            examples:
              SUCCESS:
                value:
                  name: "Heidi"
                  department: "Engineering"
                  designation: "Team Lead"
              INVALID_ID:
                value:
                  id: "xyz"
                  name: "Heidi"
                  department: "Engineering"
                  designation: "Team Lead"
      responses:
        '201':
          description: Employee Created Response
          content:
            application/json:
              schema:
                $ref: '#/components/schemas/Employee'
              SUCCESS:
                value:
                  id: 10
                  name: "Heidi"
                  department: "Engineering"
                  designation: "Team Lead"
        '400':
          description: Invalid request
          content:
            text/plain:
              schema:
                type: string
              examples:
                INVALID_ID
components:
  schemas:
    Employee:
      title: Employee
      type: object
      required:
        - name
        - department
        - designation
      properties:
        id:
          type: integer
        name:
          type: string
        department:
          type: string
        designation:
          type: string
Note the contract-invalid id in the example named INVALID_ID. Specmatic accepts it and sends it to the system under test, expecting a 400 response.
A contract-invalid example would not be allowed in the example named SUCCESS, as it is an example that should trigger a 200 response (and hence must be a contract-valid example).
Run only passing tests in CI
If the contract tests are still a work in progress, you can commit what’s working and prevent other contract tests that are known to be broken from running.
To do this, in Java, set the filterName Java system property in the @BeforeAll method (if you use JUnit 5) like this:
System.setProperty("filterName", "TEST1");
Now only the contract tests with TEST1 in their test description will run. Test descriptions conveniently include the name of the tests used in the OpenAPI examples, and so can be used as the filtering value.
filterName can also be provided a comma separate value:
System.setProperty("filterName", "TEST1, TEST2");
Now only the contract tests with either TEST1 or TEST2 in their test descriptions will run.
You can also use the command-line parameter --filter-name.
Omitting some tests
Set the filterNotName Java system property in the @BeforeAll method (if you use JUnit 5) like this:
System.setProperty("filterNotName", "TEST1");
Now only the contract tests which do not have TEST1 in their test description will run.
You can also use the command-line parameter --filter-not-name.
API Coverage
After running the tests, Specmatic will print out a tabular report showing which APIs were covered by the tests.
In addition, it can read the APIs exposed by the application from the actuator module, to indicate in the same report which APIs were not covered by contract tests.
To get this working:
- Turn on the actuator module, and enable the mappings endpoint. You can read more about this online.
- Set the system property
endpointsAPIto the mappings endpoint exposed by actuator.
Look at the sample project below to see this in action. Observe the system property, set in the ContractTest class, and the actuator-related dependency added in pom.xml.
The data in the coverage report is written to a file at build/reports/specmatic/coverage_report.json, relative to the directory from which Specmatic was executed.
Adanced Features
Generative Tests
Contract testing within the bounds of the contract is not enough. HTTP prescribes what should happen when contract-invalid requests are sent. To ensure that the application operates as required by HTTP, we need to test it with contract-invalid requests.
Given an API specification, we know what an API’s request should look like, and hence we can come up with a number of counter examples.
Let’s use this specification as an example.
openapi: 3.0.0
info:
  title: Products
  version: '1.0'
servers: []
paths:
  '/znsio/specmatic/products':
    post:
      summary: ''
      requestBody:
        content:
          application/json:
            schema:
              $ref: '#/components/schemas/Product'
            examples:
              SUCCESS:
                value:
                  color: green
                  category: medicals
      responses:
        '201':
          description: Response to successful product creation
          content:
            application/json:
              schema:
                type: object
                required:
                  - id
                properties:
                  id:
                    type: integer
              examples:
                SUCCESS:
                  value:
                    id: 10
        '400':
          description: Repsonse to a bad product creation
          content:
            application/json:
              schema:
                type: object
                required:
                  - message
                properties:
                  message:
                    type: string
components:
  schemas:
    Product:
      title: Product
      type: object
      required:
        - color
        - category
      properties:
        color:
          type: string
        category:
          type: string
A contract-valid test is found in the examples named SUCCESS.
If we send a request containing the body {"color": null, "category": "medicals"}, the application should respond with a 400, because according to the specification, the value of color cannot be null.
Specmatic can generate this test and more to ensure that validations for color are in place, and will do the same for `category.
Just set a property or environment variable named SPECMATIC_GENERATIVE_TESTS to ‘true’.
In Java, you could use this:
System.setProperty("SPECMATIC_GENERATIVE_TESTS", "true")
The best way to see it in action is to try it out with one of your micro-services and it’s API specifications.
Limiting the Count of Tests
Where there are no examples, Specmatic generates tests from the contract. And if there are too many optional headers, query parameters, JSON keys, nullables, and so on, Specmatic may generate too many tests.
Set a property or environment variable named MAX_TEST_REQUEST_COMBINATIONS to limit the number of combinations that will run.
Let’s use this specification as an example.
openapi: 3.0.0
info:
  title: Products
  version: '1.0'
servers: []
paths:
  '/znsio/specmatic/products':
    post:
      summary: ''
      requestBody:
        content:
          application/json:
            schema:
              $ref: '#/components/schemas/Product'
      responses:
        '201':
          description: Product Created Response
          content:
            application/json:
              schema:
                type: object
                required:
                  - id
                properties:
                  id:
                    type: integer
components:
  schemas:
    Product:
      title: Product
      type: object
      properties:
        color:
          type: string
          enum: [green, blue]
        category:
          type: string
          enum: [food, electronics]
There are no examples.
As a result, the following 4 contract tests will be generated by Specmatic from the specification.
- In the first, the body contains {“color”: “green”, “food”}
- In the second, the body contains {“color”: “red”, “electronics”}
- In the third, the body contains {“color”: “green”, “electronics”}
- In the fourth, the body contains {“color”: “red”, “food”}
Look closer at the above tests. They are sorted such that in the first two tests, all 4 values are represented.
If you run only the first 2, all the possible values will be represented in tests, without having to run all 4.
Of course there’s value in running all possibilities, but if there are too many of them you may wish to prioritise the first few, enough that all the values are represented in the tests.
In this example, we may ensure that just the first 2 tests run with the following code:
System.setProperty("MAX_TEST_REQUEST_COMBINATIONS", "2");
Externalized test data
Specmatic can execute contract tests using test data loaded from JSON files. This is useful when the specification cannot be modified to add examples, such as a conformance or compliance process where the specification is an industry-wide single-source-of-truth.
Specmatic will validate the test data against the specification before using it. It’s not much different from how it uses examples within the specification, except that the test data is in an external JSON file.
Example with a path parameter
To convert the GET_DETAILS test from api_order_with_oauth_v1.yaml into an externalised test:
- Create a new directory named
api_order_with_oauth_v1_testsin the same directory asapi_order_with_oauth_v1.yaml. - In it, put a file named get_details.json (the name is immaterial) with the following content:
{
"http-request": {
  "method": "GET",
  "path": "/products/(id:number)",
  "path-params": {
    "id": 10
  }
},
"http-response": {
  "status": 200
},
"name": "GET_DETAILS"
}
Example with a request body
To convert UPDATE_DETAILS, add a new file called update_details.json with the following content:
{
  "http-request": {
    "method": "GET",
    "path": "/products/(id:number)",
    "path-params": {
      "id": 10
    },
    "body": {
      "name": "XYZ Phone",
      "type": "gadget",
      "inventory": 10,
      "id": 10
    }
  },
  "http-response": {
    "status": 200
  },
  "name": "UPDATE_DETAILS"
}
Example with a query parameter
To convert SEARCH_2, add a file named search_2.json with the following content:
{
  "http-request": {
    "method": "GET",
    "path": "/products/(id:number)",
    "query-params": {
      "name": "XYZ",
      "type": "gadget"
    }
  },
  "http-response": {
    "status": 200
  },
  "name": "SEARCH_2"
}
Example with an omitted query parameter
To convert SEARCH_1, add a file named search_1.json with the following content:
{
  "http-request": {
    "method": "GET",
    "path": "/products/(id:number)",
    "query-params": {
      "type": "gadget"
    }
  },
  "http-response": {
    "status": 200
  },
  "name": "SEARCH_1"
}
In the above example, we have completely omitted the name query parameter. Since the name is optional, Specmatic does not send requests with name.
However if the query parameter in question is mandatory, and is omitted from the example, Specmatic generates a randomized value and sends this query parameter when sending the request in the contract test.
Generating examples
You can generate sample data from a specification as a starting point or scaffolding for your contract tests, using the examples command:
java -jar specmatic.jar examples employees.yaml
In the above case, sample files will be written into the directory named employees_data.